
|
|
| Правила Форума редакция от 22.06.2020 |
|
|||||||
|
|
Окажите посильную поддержку, мы очень надеемся на вас. Реквизиты для переводов ниже.  WMZ: Z021474945171 WME: E159284508897 WMUSDT: T206853643180 4100117770549562 Спасибо за поддержку! WMZ: Z021474945171 WME: E159284508897 WMUSDT: T206853643180 4100117770549562 Спасибо за поддержку!
|
|
 |
|
|
Опции темы | Опции просмотра |
 Language
|
 22.12.2005, 19:42
|
 #1
#1
|
|
Неактивный пользователь
Пол: 
Регистрация: 14.11.2005
Сообщений: 9
Репутация: 5
|
Нужно изогнуть изображение в виде дуги.
:7: |

|


|
|
|
| Реклама: |
|
23.12.2005, 13:25
|
#2
|
|
ViP
 Регистрация: 04.10.2005
Адрес: Киев
Сообщений: 116
Репутация: 725
|
Filter-Distort-Shear, но лучше действительно покажи изображение. :xe
__________________
Варкалось.Хливкие шорьки пырялись по наве и хрюкотали зелюки, как мюмзики в мове. |
|
|
|
|
26.12.2005, 13:08
|
#3
|
|||||||||||||||||||||||
|
ViP
Регистрация: 04.10.2005
Адрес: Киев
Сообщений: 116
Репутация: 725
|
После использования Filter-Distort-Shear примени Edit-Transform-Distort и выровняй перпендикулярно дуге. Другого способа не знаю. :4:
__________________
Варкалось.Хливкие шорьки пырялись по наве и хрюкотали зелюки, как мюмзики в мове. |
|||||||||||||||||||||||
|
|
|
| Сказали спасибо: |
|
12.07.2006, 18:25
|
#4
|
|
Старожил
 Пол:
Регистрация: 19.05.2006
Сообщений: 1,110
Репутация: 328
|
Edit-transform-Wrap, и изгибай как только душе угодно
|
|
|
|
|
27.11.2006, 01:14
|
#5
|
|
Ветеран
Пол:
Регистрация: 18.11.2006
Адрес: Киевская Русь
Сообщений: 9,017
Репутация: 84746
|
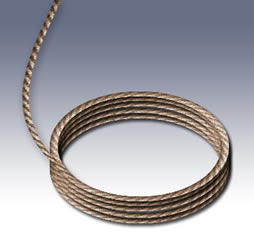
1 ЧАСТЬ
 1 Create a new document. The size here is really important because it will determine the angle of the coil. In this example I used 600x600. Look at the 2 examples at the end of the tutorial, the variation was created on 800x600, notice that the angle is a little wider and less round. Personally I think I prefer the 800x600, but experiment with different sizes and see how you like the results. Create a new layer and choose filter>sketch>halftone pattern. Size =2 (use higher for a higher res image) Push the contrast pretty high 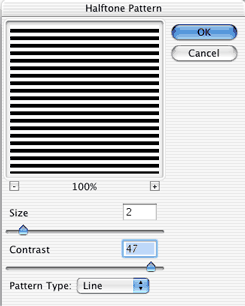 2 Now rotate the pattern by pressing cmd/ctrl+T for free transform and then pulling one of the corners around. (You may enlarge the pattern to fill more of the page if you wish.) 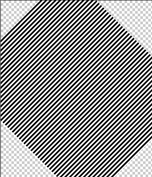 3 To give a more frayed look add some noise: filter>noise>add noise 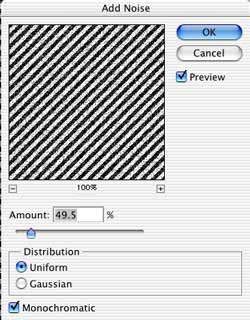 4 Make a selection with the rectangular marquee tool. This will be a strand of rope  5 Press Cmd/ctrl+J to copy the selection to a new layer. Hide the layer underneath by clicking on the eye icon. Position the rope near the center of the page 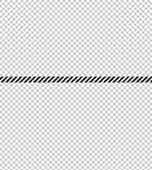 6 Lets make it coil… filter>distort>polar coordinates and choose rectangular to polar. 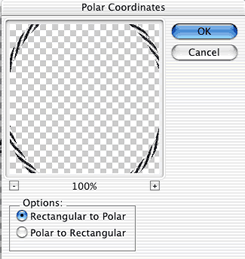 Последний раз редактировалось doctor ru; 27.11.2006 в 01:26.. |
|
|
|
| Сказали спасибо: |
|
27.11.2006, 01:15
|
#6
|
|
Ветеран
Пол:
Регистрация: 18.11.2006
Адрес: Киевская Русь
Сообщений: 9,017
Репутация: 84746
|
2 ЧАСТЬ
7 Te contrast between the black and white is too strong, lets tone it down a bit by choosing the levels control. Cmd/ctrl+L Move the bottom slider (shown) to the right to tone down the shadows. 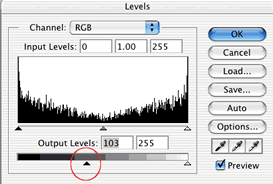 8 Lets add some depth. Press the little ”f” in the layers palette to open the layer styles. Choose inner shadow. Use the setting here.Also add a drop shadow as shown. 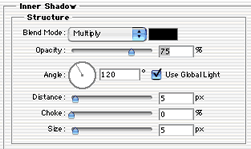  9 Press ok and you will see a realistic loop of rope. Duplicate the layer 4 or 5 times and stack them as shown, we now have the coil.   10 Now for the end of the rope: Show the pattern layer again and make a selection and copy it to a new layer just like we did before. (cmd/ctrl+J)  11 Rotate the rope 90 deg.  12 To make it ”wiggle” filter>distort>shear Click to add points and drag as shown. Press ok   13 Let’s blend it in. Add a layer mask by clicking the new layer mask icon in the layers palette. 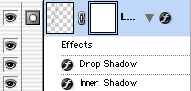 14 Choose a large soft black brush and paint the very end of the rope and notice it will fade smoothly into the coil.  15 To the left is our final rope with a little hue/saturation added to give it a hint of color. Here is a variation with a wider canvas width and a different hue/saturation value applied. I also nudged a couple of the ”coils” so they were not so perfect. This results in a more natural finish. So there you have it ”yehaw” round ‘em up cowboy! Have fun with the rope and see you at the café  Последний раз редактировалось doctor ru; 27.11.2006 в 01:35.. |
|
|
|
| Эти 2 пользователя(ей) сказали cпасибо за это полезное сообщение: |
|
07.05.2007, 22:54
|
#7
|
|
Неактивный пользователь
Регистрация: 07.05.2007
Сообщений: 7
Репутация: 0
|
а параметрически кривизну задать возможно? каким путём?
|
|
|
|
|
04.06.2007, 06:36
|
#8
|
|
Неактивный пользователь
Пол: 
Регистрация: 05.02.2007
Сообщений: 11
Репутация: 3
|
самый простой способ Edit-transform-distort потом также
Edit- transform-wrap обычно все садится классно можно конечно и фильтром но это сложнее ..... |
|
|
|
|
25.07.2007, 03:12
|
#9
|
|
Постоялец
Пол:
Регистрация: 28.01.2007
Адрес: Украина
Сообщений: 336
Репутация: 691
|
а если нада разместить бусинки по кругу или дуге не меня их формы, справятся эти плагины? Как это лутше сделать? Или может это вопрос для отдельной темы?
|
|
|
|
|
27.07.2007, 16:55
|
#10
|
|
Неактивный пользователь
Регистрация: 27.07.2007
Сообщений: 1
Репутация: 0
|
Edit-transform-distort
|
|
|
|
|
23.09.2007, 21:59
|
#11
|
|
Пользователь
 Пол:
Регистрация: 23.09.2007
Сообщений: 48
Репутация: 2
|
"Switch between free transform and warp modes" на топтулпанели.
|
|
|
|
|
11.02.2008, 01:03
|
#12
|
|
Неактивный пользователь
Регистрация: 11.02.2008
Сообщений: 5
Репутация: 1
|
А попробуйте в Иллюстраторе, там куча прекрасных инструментов для подобных вещей, например кисти.
|
|
|
|
|
12.02.2008, 15:00
|
#13
|
|
Неактивный пользователь
Регистрация: 12.02.2008
Сообщений: 1
Репутация: 0
|
Transform->Warp
|
|
|
|
|
13.10.2012, 11:17
|
#14
|
|
Неактивный пользователь
Пол:
Регистрация: 13.10.2012
Сообщений: 28
Репутация: 0
|
на трансформе wrap режим не подходит?
|
|
|
|
|
21.10.2014, 16:38
|
#15
|
|
Неактивный пользователь
Пол:
Регистрация: 10.03.2014
Сообщений: 5
Репутация: 1
|
в фотошопе Edit-Transform-Distort и гнуть полный контроль
|
|
|
|
|
 Похожие темы
|
||||
| Тема | Автор | Раздел | Ответов | Последнее сообщение |
| Не растянутое изображение | Триша | Скорая помощь | 4 | 14.06.2009 15:33 |
| Как раскодировать изображение | Dynamite | Программирование | 5 | 09.10.2008 18:41 |
| Чем напечатать изображение | КириллK | Архив | 5 | 28.02.2008 09:24 |
| Как вставить изображение? | KIT | Архив | 3 | 02.02.2008 15:22 |
| S.T.A.L.K.E.R. кривое изображение | Yuric78 | Помощь по играм | 8 | 06.11.2007 07:52 |
|
|


 Линейный вид

